Click Here for Free Bodybuilding and Fitness Magazine Subscription

Click Here To Build Your Own Home Gym
Build Your Own Squat Rack
Article care of www.theministryoffitness.com/urb.htm
Homemade Squat Rack Plans
by Bill
McBride.
How To Build A Squat Rack.
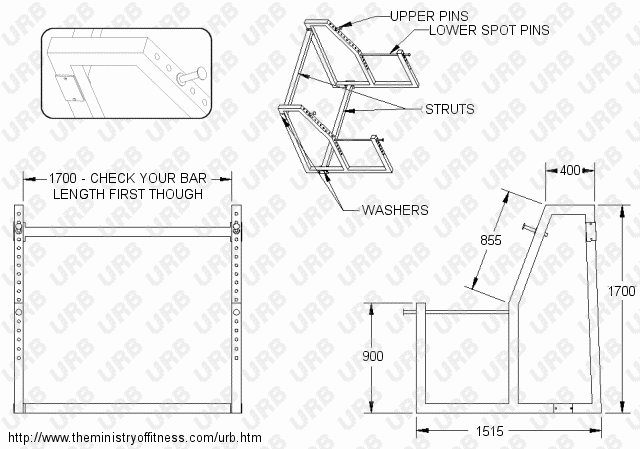
This rack was copied from my local gym. The construction of it has been slightly modified to make it more suited to the home constructor. The original used pins that had stepped ends that would require a lathe to manufacture. To overcome this a second washer is welded onto the upper and lower pins. The 100mm dimension shown between the two washers was chosen to be big enough to get your hand into only. Feel free to alter this dimension.
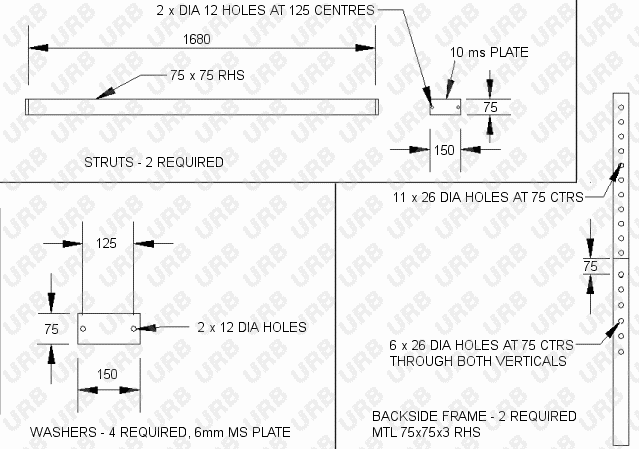
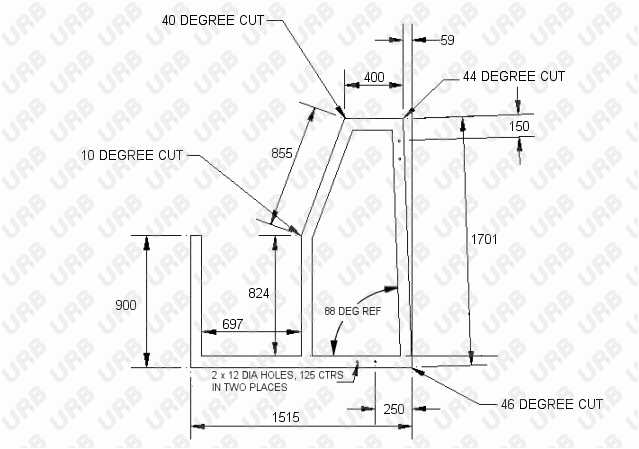
On the drawings I have indicated the angles to cut the RHS at to give the correct assembly. There are two side frames to weld up and two strut bars. The two strut bars bolt onto the side frames to make a complete unit. You could weld the strut bars in place but it would be difficult to transport in this state. The four washers are to put on the other side of the strut bars to prevent the side wall of the RHS from crushing when the M12 bolts are tightened.
I have indicated to check the length of your favorite bar to make sure the rack is not too wide for your bar. The bar in my gym only has about 50mm of clearance from the outside of the frame to the collar. This can make walking back with a heavy weight a bit tricky at times.
Tools
Required.
For the construction you will
need,
A welder
An angle
grinder
A drill press
A 12mm
drill
A 25mm metal cutting hole saw.
To Make It
Up.
First
off will be to cut the RHS up. I added up the lengths from the drawing
which came to just under 8m for one side and one strut. In Australia a std
length of RHS is 8m so this worked out nicely. Steer away from hardware
shops for the RHS as they will charge LOTS more for it, the large metal
companies who make the tube normally have a ‘direct to the public’ area
where you should be able to but the tube cut in half (add up some of the
lengths until your about half way and give them that dimension) which with
a good set of roof bars you could put in onto you car to get home. Some
shops may even be able to cut the entire length up into all the pieces
required, normally without the angles though.
Once the RHS is cut the holes need to be drilled. For the four short vertical sections I would put one 900mm length together with one 824mm length and tack weld (very lightly) them together. Using a hole saw or a large drill bit in a pedestal drill after marking out and clamping the RHS down, I would drill the six holes. If using a hole saw you will eng up only being able to drill through the top RHS and one face of the lower RHS, after this separate the two halves and finish making the holes right through. Repeat this with the other sides uprights. Drill the angled sections 11 holes right through as well. The drill (or hole saw) should be around 26 mm to give clearance for the 25mm bars. This will vary a bit depending on what bar you obtain. Occasionally in Australia I have ordered 25mm bar and ended up with 25.4 (1”) bar instead. Check this before drilling all of the holes.
Lay one side frames worth of steel on the floor arranged to the correct shape. Start by getting one of the angles right and put a couple of tacks on one side of the joint (it will be a vertical weld). This allows you to move the joint after the first tack has cooled to get it back into shape before you weld the other side. Once all of the joints have been tacked you can finish weld the frame. It would be beneficial to place the lower spot pins in place before welding the frame to make sure all of the holes line up. With one side complete you can use this as a template for the other side. Providing both sides have the same errors it should still work OK.
Once the two main frames are complete cap the top of the 900mm long RHS with a section of flat bar, clean up any welds that are still messy and paint the whole thing. The strut bars need the plates welded onto them after the mounting holes have been drilled, paint when complete.
The racking pins and lower spot bars will probably be the next items to make. It is your choice to use either mild steel (cheaper and easier) or go for a grade steel such as 4140. The upper pins will be no problem (can take about 10 Tonne in shear) but if you like to drop 200kg from your shoulders to the lower pins then the 4140 will not bend, as easily. The end stops for the bars was only designed as a 25mm washer welded into place. This can be made as elaborate as you please. The 8mm diameter hole in the end on the pin is for an retainer pin to go through, very important that this is in place. If you make the pins from 4140 you need to keep the spindle speed on the drill low, the pressure high and some coolant on the bit.
The more care that is taken the better the rack will look and function, after cutting the round bar to length grind a chamfer on the end, maybe buy a sanding disk for your grinder and dress the welds and the ends of the spot pins with this.
Other
Items
The unit in the gym has a stainless steel sheet riveted to the
front face of the inclined RHS. This is there so that when you shoulder
charge the frame with the bar you don’t chip the paint. There are a number
of low cost ways to reduce this problem, such as masking tape over your
particular hit area. I am sure that all you creative folk will find ways
as well.
Good Luck and Have Fun Squatting.
The Drawings

Drawing 1 - General Information
Drawing 2 - Upper Pins and Lower Spot Bar Details

Drawing 3 - Struts, Washer and Backside Frame Details

Drawing 4 - Side Frame Construction Details
DISCLAIMER - THE INFORMATION CONTAINED WITHIN THIS ARTICLE IS FOR INFORMATIONAL PURPOSES ONLY. IT IS INTENDED ONLY AS A REFERENCE FOR BUILDING YOUR OWN SQUAT RACK. THE AUTHOR, BILL McBRIDE (A PROFESSIONAL ENGINEER), OR THE SITE WHERE THIS DOCUMENT IS HOSTED ARE MERELY PROVIDING INFORMATION AND OFFER NO WARRANTY OR GUARANTEES WITH THIS DESIGN. EACH OF US, AS INDIVIDUAL'S, MUST BE ACCOUNTABLE FOR OUR ACTIONS.
No Welding, Easy Detailed Plans. Construction Is Simple And Quick,
No Special Skills Required, Can Be Built For A Fraction Of The Cost
Of Most Commercial Home Gyms And Does Much More!

Click Here To Build Your Own Home Gym

